How to install a climbing hangboard on drywall: tutorial
- 5 min reading
- Train
- Tutorials
How to install your VerticalBoard on drywall: the complete guide
Hi climber! You've just received your VerticalBoard and can't wait to fix it? Do you only have drywall at home? No problem! Today we're taking you step-by-step through a concrete installation. 🧗♀️
Materials required:
- Your VerticalBoard (of course!)
- Supplied screws
- A door frame
- 2 sheets of plywood or OSB (min. 18mm thick, 80x30cm)
- 4 threaded bolts (15cm long, 12mm diameter)
- 4 washers
- A drill and a screwdriver
- A wrench or tool for tightening bolts
- A clamp
- A friend to help you (optional, but highly recommended)
VERTICALBOARD ONE | VERTICALBOARD EVO | VERTICALBOARD FIRST | VERTICALBOARD LIGHT
Stages
Preparation
-
Hole marking:
- Take your sheet of plywood and mark the points where you're going to drill. Recommended spacing is 70cm long and 20cm wide.
-
Temporary fixing of plywood:
- Place this first plate against the plasterboard wall and use a clamp to hold it in place. This ensures that the plate is properly aligned.
Drill and Screw
-
Drill the first holes:
- Using a drill fitted with a wooden bit, drill 4 holes in the plywood already attached. Only one hole needs to go all the way through the plasterboard.
-
Insert First Bolt:
- Place a threaded bolt in the through-hole. This will serve as a reference point for aligning the second plate.
-
Align the Second Plate:
- Hang the second plywood plate and align it with this first bolt. This ensures that the holes in the two plates are perfectly aligned.
-
Drill the remaining holes:
- While holding the second plate in place, drill the remaining 3 holes.
Assembly
-
Remove and reinstall Bolts:
- Remove the initial bolt, then insert all the bolts into the prepared holes. This is where a friend's help really comes in handy!
-
Bolt tightening:
- Add a washer to each bolt, then tighten firmly using the wrench or tool you have.
-
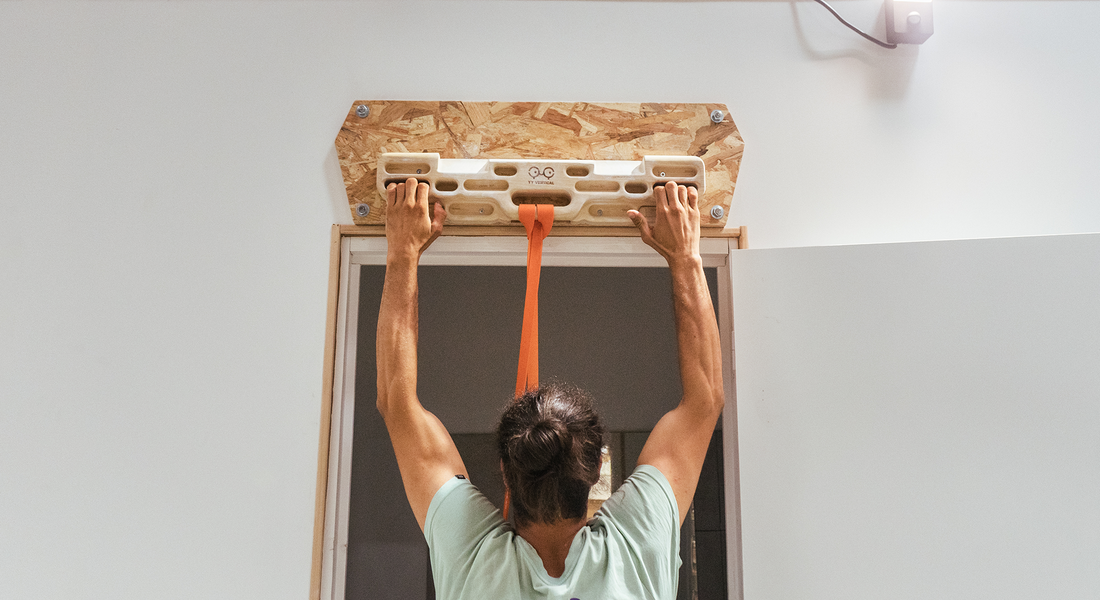
Screw on the VerticalBoard:
- You now have two options:
- Option 1: Screw the VerticalBoard directly into the plates.
- Option 2: Pre-screw the VerticalBoard to one of the plates, then cut off the excess screws.
- You now have two options:
VERTICALBOARD ONE | VERTICALBOARD EVO | VERTICALBOARD FIRST | VERTICALBOARD LIGHT
The Final Test
-
Testing solidity:
- Before you climb like Spiderman, give the hangboard a little tug to make sure everything's secure.
Now you're ready to climb with confidence! 🧗♂️💪
We hope you find these additional details useful. See you soon for more vertical adventures!
Find the article in video format on our YY Vertical youtube channel:
What's new?

New
24.90 €

New
Boulder Chalk Bag
chalk bag
37.90 €


New
Patented Product
SandwichBase climbing hangboards support
The smart, stable support for your hangboard - no holes, no tools.
4.91
(11 notice)
189.00 €
New
29.90 €

New
Climbing Mug Evo | Design Simon Favrot
EVO Mug - Design mug with climbing grip shapé by Simon Favrot: 3 models, 1 playful challenge, 100% climbing & style
5.0
(15 notice)
25.90 €

New
KeyHolder mountain edition wall-mounted key ring
Wooden wall key ring inspired by the great summits
5.0
(5 notice)
59.90 €